My ISP Is Killing My Idle SSH Sessions. Yours Might Be Too.

tl;dr: My ISP’s CGNAT session timeout is too short, meaning TCP keepalives gets dropped. Test if your own NAT, or your ISP’s CGN, violates RFC5382‘s REQ-5 using this tool: https://github.com/AndersTrier/NAT-TCP-test.

I have been working from home more lately, where I have SSH sessions open to the servers that I’m working on. Often when I return to my computer, or switch to a SSH session that has been sitting idle for a while, the SSH connection is either dead or frozen. If the session is not already dead, the only way to gain control over my terminal again, is to send the ‘terminate connection’ ssh escape sequence <enter>~. after which SSH errors like this:

[email protected]:~$ 
client_loop: send disconnect: Broken pipe

This happened one day while I was transferring a VM image in the hundreds of gigabytes from one server to another using netcat like so:

ato@host2:~$ nc -l 1337 > hugefile 
ato@host1:~$ nc -q 1 host2 1337 < hugefile

This transfer would take multiple hours, and when I checked in after it should have finished, my SSH connections had died yet again. And sshd had taken netcat down with it, killing the transfer midway.

That’s when I decided to investigate this problem.

The OpenBSD and OpenSSH developers are known for their extreme focus on code quality. The chances that this problem is caused by a bug in OpenSSH are very slim. (In the same line as “It is (almost) never a compiler error.”)

This is probably a network problem.

I connected my laptop directly to my ISP’s “customer-provided equipment”: a coax modem in bridge mode. Then I ran tcpdump both on my laptop and on the server, and opened a SSH connection. After leaving it idle for about 2 1/2 hours, this is the result:

Client: 100.68.156.34 / 203.0.113.1, server: 130.225.254.99.

Client side
Server side

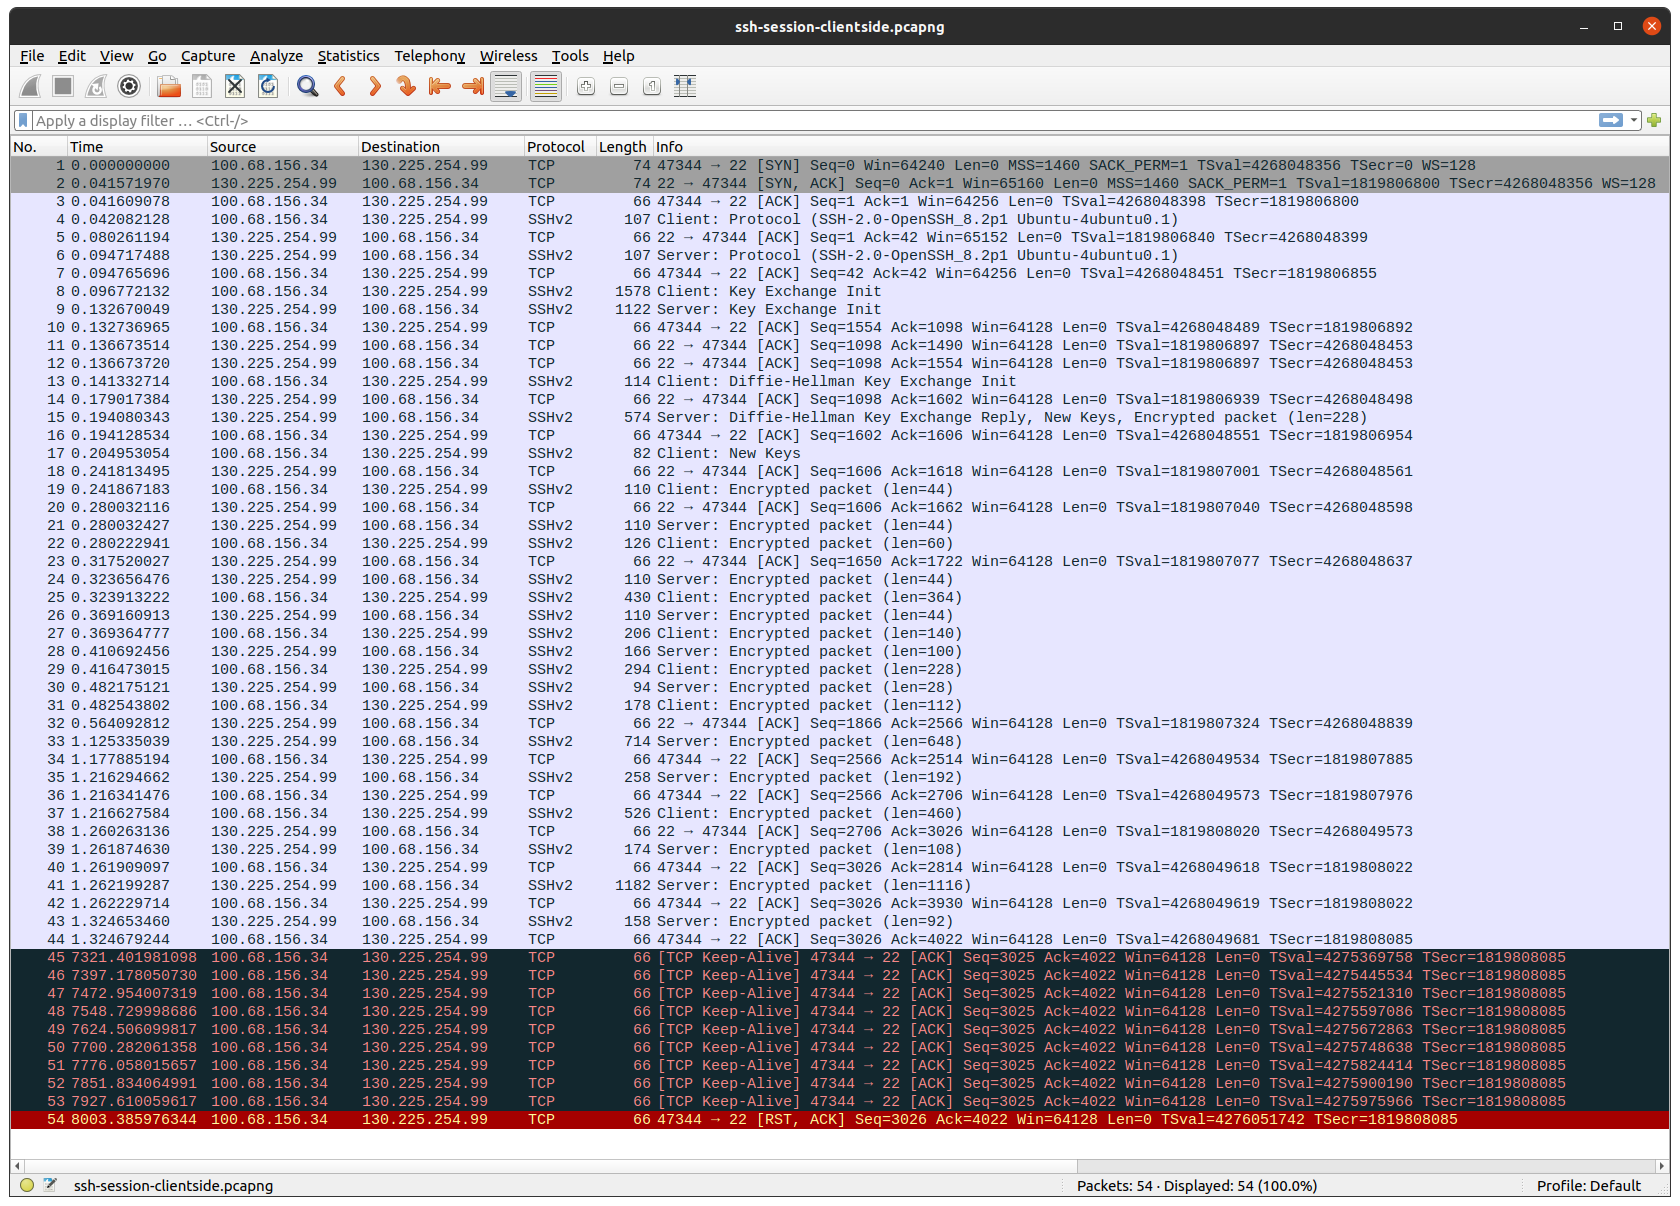
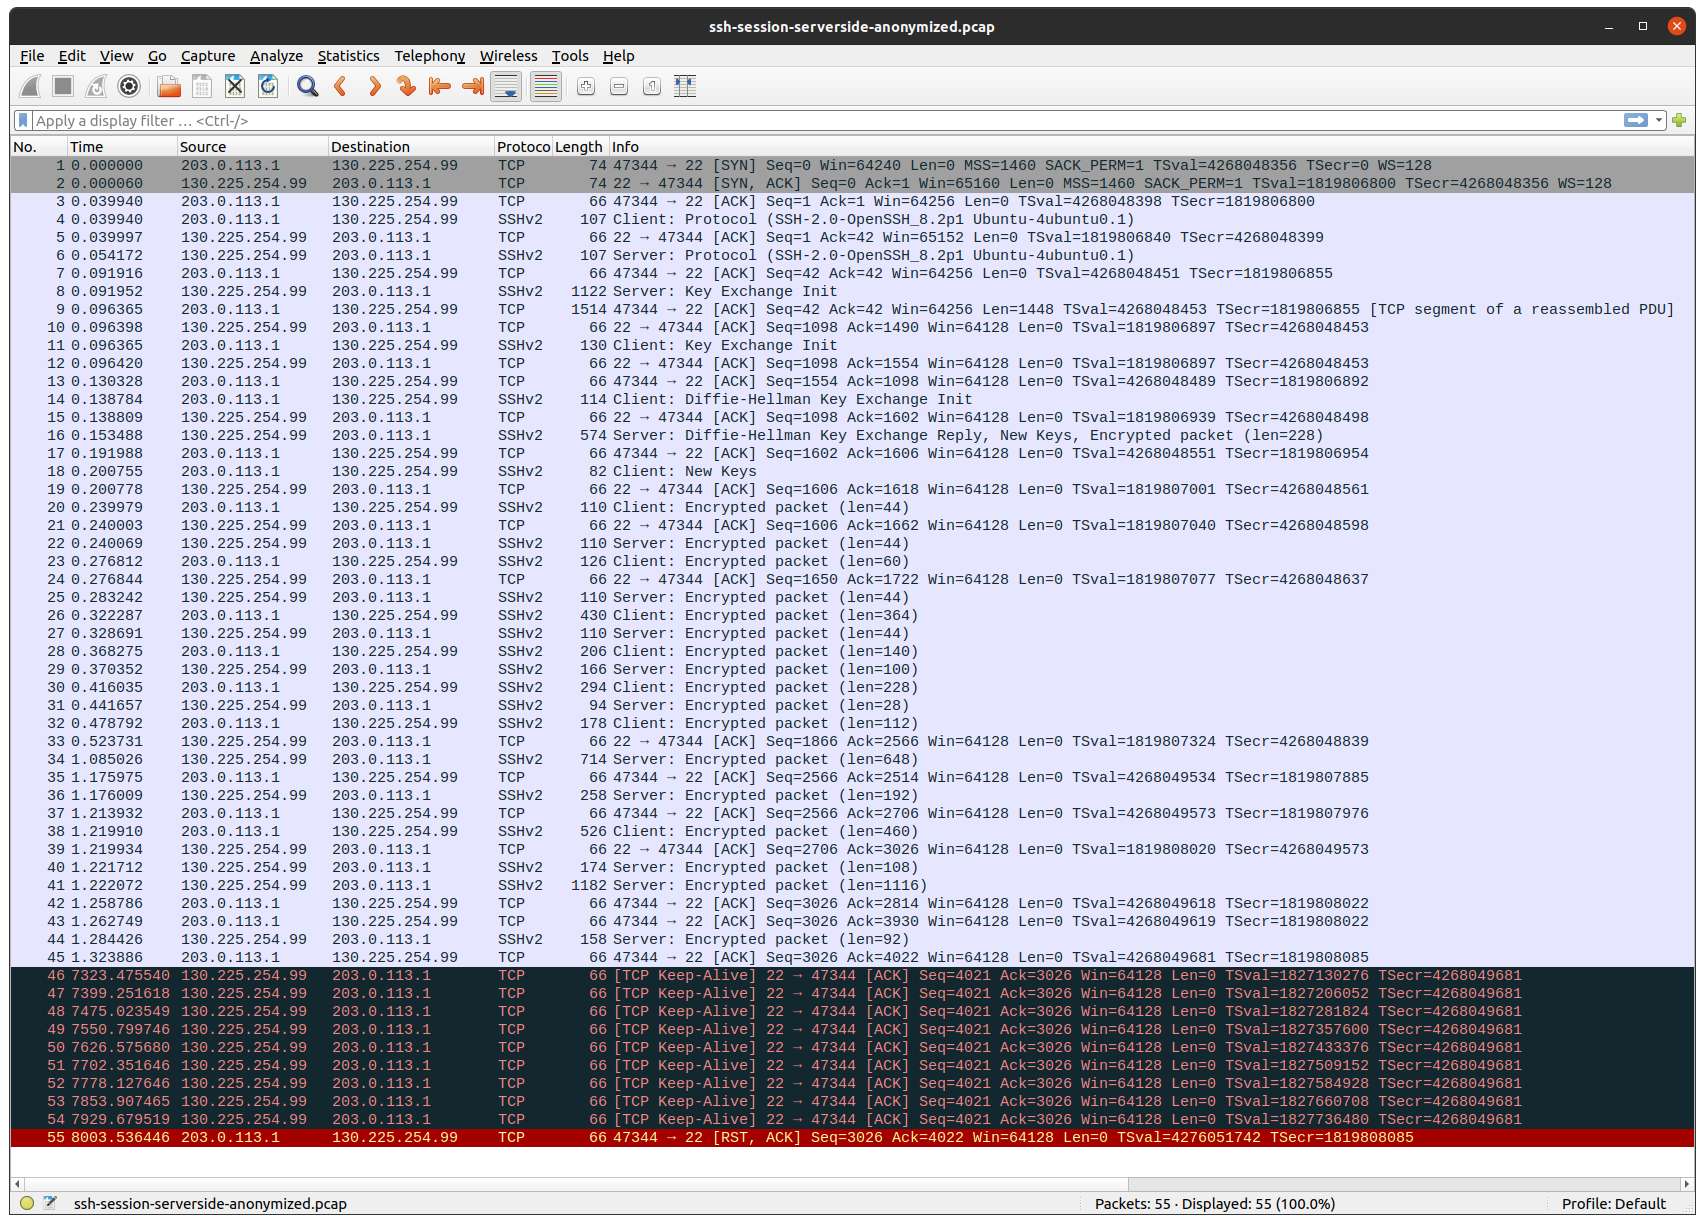
A SSH session does not generate any traffic, unless there’s new output or input. The same is true for TCP. That is why, after the TCP and SSH sessions have been established, no more packages are sent for a long time.

First thing to note, is that my laptop gets an IP in the Carrier-grade NAT address space 100.64.0.0/10, which my ISP then translates to a public internet routable IP. (Because I don’t want to leak my public IP, I used the tcprewrite tool to substitute that IP with one in TEST-NET-3).

Next thing to note, is that after about 2 hours, both the client and the server starts to send TCP-keepalive packages, but none of them come through to the other side.

Finally the client gives up on the TCP session, and sends a TCP reset package, which surprisingly goes through.

Lets see what we can find in the OpenSSH man pages about timeouts and keepalives (ssh_config(5)):

TCPKeepAlive
    Specifies whether the system should send TCP keepalive messages to the other side.  If they are sent, death of the
    connection or crash of one of the machines will be properly noticed.  This option only uses TCP keepalives (as op‐
    posed to using ssh level keepalives), so takes a long time to notice when the connection dies.  As such, you proba‐
    bly want the ServerAliveInterval option as well.  However, this means that connections will die if the route is down
    temporarily, and some people find it annoying.
    The default is yes (to send TCP keepalive messages), and the client will notice if the network goes down or the re‐
    mote host dies.  This is important in scripts, and many users want it too.
    To disable TCP keepalive messages, the value should be set to no.  See also ServerAliveInterval for protocol-level
    keepalives.
ServerAliveInterval
    Sets a timeout interval in seconds after which if no data has been received from the server, ssh(1) will send a mes‐
    sage through the encrypted channel to request a response from the server.  The default is 0, indicating that these
    messages will not be sent to the server, or 300 if the BatchMode option is set (Debian-specific). 

So TCPKeepAlive enables keepalives handled by the TCP stack implementation (Linux in my case), whereas ServerAliveInterval enables protocol level keep-alives (handled by OpenSSH).

This explains the behavior we’re observing, but also raises new questions:

  1. Can I fix my problem by enabling the ssh protocol-level-keepalives? (ServerAliveInterval)
  2. Why are the TCP keepalives only sent after 2 hours?
  3. Why is my ISP dropping my TCP keepalive packages?

I verified that by setting ServerAliveInterval to 300 (5 min), my problems disappeared. We could stop now that I found a workaround, but let’s keep digging.

The TCP keepalive interval on Linux is configured by net.ipv4.tcp_keepalive_time, which by default is set to 2 hours (7200).

anders@ubuntu-desktop:~$ sysctl net.ipv4.tcp_keepalive_time
net.ipv4.tcp_keepalive_time = 7200

Why is it set to two hours? We find our answer in RFC1122:

Keep-alive packets MUST only be sent when no data or
acknowledgement packets have been received for the
connection within an interval.  This interval MUST be
configurable and MUST default to no less than two hours.

In the following DISCUSSION section, the RFC writers elaborate on why they (in 1989) think TCP keep-alives only should be sent infrequently:

The TCP specification does not include a keep-alive mechanism because it could:
(1) cause perfectly good connections to break during transient Internet failures;
(2) consume unnecessary bandwidth ("if no one is using the connection, who cares if it is still good?"); and
(3) cost money for an Internet path that charges for packets.

Today the Internet is different from what it was in 1989 when they published that RFC. Now we have NAT everywhere, which is a hack that was accepted on IPv4 because the IPv4 address space is too small. The real solution is IPv6 which has a much bigger address space (2^32 vs 2^128).

NAT (Network Address Translation) allows many computers on a network to share the same IP. This typically works by routing your packet to a device which translates/substitutes your private RFC1918 IP (e.g 192.168.0.0/16) for a public one, and passes on the packet.

CGN (Carrier-grade NAT) is NAT run by an ISP. This allows for many customers to share a single public IP (because even with every household being assigned a single IPv4, we’re still running out). To avoid collisions with the RFC1918 ranges, ISPs are told to use the 100.64.0.0/10 range. With this setup it is not uncommon to have 3 levels of NAT. Ex, CGN, CPE that also does NAT, and the customers own router.

A NAT device must keep track of which connections are made by the clients. This information is stored in the NAT table. Whenever a packet arrives from the Internet, it checks if the packet belongs to a connection in its NAT table, to determine which client to send the package to. If it doesn’t belong to any connections, it drops the packet.

This wouldn’t work if the NAT table only stored IP addresses – which client should the NAT device send the packet to if receiving a packet from a server two of its clients are connected to? That is why – unlike routers – NAT devices have to cross protocol boundaries, and look deeper inside the packet, and find a “transport identifier“. For TCP and UDP the identifiers used are the source and destination port numbers, and for ICMP the Query Identifier is usually used.

A NAT table looks something like this (we’ll ignore ICMP for now):

PROTOCOL SRCIP       SRCPORT DSTIP          DSTPORT NEWSRCPORT IDLETIME
TCP      192.168.1.1 52264   130.225.254.99 22      52264      983
UDP      192.168.1.2 39252   8.8.8.8        53      39252      0

This NAT hack unfortunately opened up Pandora’s box of problems that we are still dealing with today. For example, you can no longer initiate a connection to a computer behind NAT. The NAT device does not know which host to send the packet to. This is why NAT’ing is often equated with firewalling. It is not a feature as such. It is a side effect of the NAT hack.

Back when NAT was introduced, it was not uncommon for protocols to rely on the server establishing a second connection back to the client. In “Active FTP” for example, the server will initiate a new connection back to the client (the data channel) after the client has connected. For this to work the NAT must be even more protocol aware, and preemptively create a mapping for the requested port. The same is true for SIP (used for VoIP) and a few other protocols. This is why most NAT devices can be configured to be FTP and SIP aware. Exactly this feature was recently shown to be a huge security problem – you can trigger this functionality to create a mapping of your choosing from a visitors browser, and connect to any device behind the visitors NAT. Read more about the NAT Slipstreaming attack here.

For big data transfers, or latency sensitive connections (file sharing, VoIP, gaming etc) it is very much preferable to have a direct connection between hosts. But if both hosts are behind a NAT, this is not immediately possible. To solve this problem, a new hack was introduced: NAT hole punching, where you – by using a third-party – can trick your NAT devices to allow traffic directly between the hosts by creating a NAT table entry (“punching” a hole) in both NATs simultaneously. It is only somewhat reliable, and works best with UDP in my experience.

NAT is also one of the reasons the new QUIC protocol uses UDP packages instead of its own protocol. Too many devices will fail to handle the packet correctly if they introduced a new protocol number to use in the IP header. Where should the NAT device look for a transport identifier in an unknown protocol header?

Another problem that arises because of NAT is: when is it safe to remove an entry from the NAT table? Sometimes the answer is simple: when you see that the connection has been closed (e.g the TCP Normal Close Sequence). But when is it safe to remove an established TCP connection (were you haven’t yet seen the connection being closed) on which no packages have been sent for a long time? Lets check what RFC5382: NAT Behavioral Requirements for TCP has to say.

TCP connections can stay in established phase indefinitely without
exchanging any packets.  Some end-hosts can be configured to send
keep-alive packets on such idle connections; by default, such keep-
alive packets are sent every 2 hours if enabled [RFC1122].
Consequently, a NAT that waits for slightly over 2 hours can detect
idle connections with keep-alive packets being sent at the default
rate.

REQ-5:  If a NAT cannot determine whether the endpoints of a TCP
connection are active, it MAY abandon the session if it has been
idle for some time.  In such cases, the value of the "established
connection idle-timeout" MUST NOT be less than 2 hours 4 minutes.

On Linux this timeout is controlled by nf_conntrack_tcp_timeout_established which by default is 5 days. On OpenWRT for example this is lowered to 7440 seconds (2 hours and 4 minutes) to work better on slow hardware.

Alright. Enough rant about NAT. Let’s begin probing my ISP to test if they respect the 2 hours and 4 minutes timeout.

I wrote three different tests which can be found here: https://github.com/AndersTrier/NAT-TCP-test

The idea is to establish a TCP connection to a server, wait some time and then send some data to test if the connection still works. This way we can discover the timeout period before the NAT will drop the connection. Using a single TCP connection at a time, this would take forever. Instead the tests will spawn 130 connections on startup, and test the first connection after 1 minute, the second after 2 minutes and so on (2 hours and 10 minutes total).

tcp-send-test will do exactly that.

tcp-recv-test will instead ask the server to test the connections (i.e be the one to try and send some send data after waiting).

tcp-keepalive-test works essentially the same way as tcp-send-test, but instead of sending actual data, it will use TCP-keepalives. (Maybe my ISP simply drops all keepalive packages?)

By default, the tests are configured to connect to a server sponsored by the non-profit organization dotsrc.org.

This is the output from tcp-send-test when I tested my ISP:

anders@ubuntu-desktop:~/git/NAT-TCP-test$ ./tcp-send-test 
 [+] Trying to establish connections: 0 1 2 3 4 5 6 7 8 9 10 11 12 13 14 15 16 17 18 19 20 21 22 23 24 25 26 27 28 29 30 31 32 33 34 35 36 37 38 39 40 41 42 43 44 45 46 47 48 49 50 51 52 53 54 55 56 57 58 59 60 61 62 63 64 65 66 67 68 69 70 71 72 73 74 75 76 77 78 79 80 81 82 83 84 85 86 87 88 89 90 91 92 93 94 95 96 97 98 99 100 101 102 103 104 105 106 107 108 109 110 111 112 113 114 115 116 117 118 119 120 121 122 123 124 125 126 127 128 129 
 [+] All connections established
 [+] Connection 0 worked
 [+] Connection 1 worked
 [+] Connection 2 worked
 [+] Connection 3 worked
 [+] Connection 4 worked
 [+] Connection 5 worked
 [+] Connection 6 worked
 [+] Connection 7 worked
 [+] Connection 8 worked
 [+] Connection 9 worked
 [+] Connection 10 worked
 [+] Connection 11 worked
 [+] Connection 12 worked
 [+] Connection 13 worked
 [+] Connection 14 worked
 [+] Connection 15 worked
 [+] Connection 16 worked
 [+] Connection 17 worked
 [+] Connection 18 worked
 [+] Connection 19 worked
 [+] Connection 20 worked
 [+] Connection 21 worked
 [+] Connection 22 worked
 [+] Connection 23 worked
 [+] Connection 24 worked
 [+] Connection 25 worked
 [+] Connection 26 worked
 [+] Connection 27 worked
 [+] Connection 28 worked
 [+] Connection 29 worked
 [+] Connection 30 worked
 [+] Connection 31 worked
 [+] Connection 32 worked
 [+] Connection 33 worked
 [+] Connection 34 worked
 [+] Connection 35 worked
 [+] Connection 36 worked
 [+] Connection 37 worked
 [+] Connection 38 worked
 [+] Connection 39 worked
 [+] Connection 40 worked
 [+] Connection 41 worked
 [+] Connection 42 worked
 [+] Connection 43 worked
 [+] Connection 44 worked
 [+] Connection 45 worked
 [+] Connection 46 worked
 [+] Connection 47 worked
 [+] Connection 48 worked
 [+] Connection 49 worked
 [+] Connection 50 worked
 [+] Connection 51 worked
 [+] Connection 52 worked
 [+] Connection 53 worked
 [+] Connection 54 worked
 [+] Connection 55 worked
 [+] Connection 56 worked
 [+] Connection 57 worked
 [+] Connection 58 worked
 [-] Connection 59 is dead (read)

We found the culprit! The connection tested after waiting slightly more than 60 minutes didn’t work, meaning they dropped the connection from their NAT table. 1 hour is too short time for them to wait – they should wait at least 2 hours and 4 minutes. I documented my findings, and sent an email to my ISP. I quickly got a response back acknowledging that this is a bug on their side, and thanking me for my research. They still haven’t fixed the problem though.

The tcp-keepalive-test gave the same result, but strangely enough the tcp-recv-test reported all connections as working. I assume this is because I pay my ISP to have a static public IPv4 mapped to my CGN address. But then why did the server’s keepalive packages get dropped in the SSH example? I speculate that my ISP drops those because they don’t refer to a valid TCP session anymore.

Actually they shouldn’t track my connections at all – they should just forward all packages, and only translate the source or destination IP. But that’s a problem for another day.

If you run the tests, you should start both tcp-send-test and tcp-recv-test. I’ve seen some CGN implementations that only fail the tcp-recv-test.

Here’s what a test looks like with a NAT/CGN that is RFC compliant:

anders@ubuntu-laptop:~/git/NAT-TCP-test$ ./tcp-recv-test 
 [+] All connections established
 [+] Waiting for the server to close a connection
 [+] Open connections: 130
 [+] Connection 0 returned after 1m 0s: 60

 [+] Waiting for the server to close a connection
 [+] Open connections: 129
 [+] Connection 1 returned after 2m 0s: 120

[...]

 [+] Waiting for the server to close a connection
 [+] Open connections: 8
 [+] Connection 122 returned after 123m 11s: 7380

 [+] Waiting for the server to close a connection
 [+] Open connections: 7

/* no more output produced by the application */

Thanks for reading! I hope you learned something. I’m available for hire. I do computer security and networking. Shoot me an email at hi@<this domain>.

Update: I heard back from my ISP. They told me that the session timeout on their CGN is more than a day, so they continued to investigate the problem (using the tooling I wrote).

They were able to determine that it is actually the cable/coax modem (provided by my ISP) that is killing my idle connections! When put in “bridge mode” it still does connection tracking, and it drops packages which do not belong to any known connections. On this device the idle-timeout is 1 hour. This timeout should be updated to be at least 2 hours and 4 minutes, but it would be even better if it didn’t do any connection tracking at all while in bridge mode.

Using an iPod with a damaged hard drive

e29616, CC BY 2.0, via Wikimedia Commons

I recently bought an used iPod Classic 6th gen. While the storage capacity on the backside is specified to be 80 GB, I was only able to copy around 20GB of data to the hard drive before the iPod would shut itself off.
Lets fix that.

The iPod can boot in “emergency disk mode”, which boots a minimal OS that just exposes the internal hard drive over USB. I’ll use this mode in the rest of this post, as I figure that what I do won’t be disturbed by any software on the iPod.

To confirm the problem, I tried writing zeros all over the drive, and as expected, after writing 18 GB, the iPod crashed.

# dd if=/dev/zero of=/dev/sda bs=512K oflag=sync
dd: error writing '/dev/sda': Input/output error
34285+0 records in
34284+0 records out
17974689792 bytes (18 GB, 17 GiB) copied, 1065.78 s, 16.9 MB/s
# dmesg
[80318.901496] sd 2:0:0:0: [sda] tag#0 FAILED Result: hostbyte=DID_OK driverbyte=DRIVER_SENSE
[80318.901504] sd 2:0:0:0: [sda] tag#0 Sense Key : Medium Error [current]
[80318.901509] sd 2:0:0:0: [sda] tag#0 Add. Sense: Write error - auto reallocation failed
[80318.901515] sd 2:0:0:0: [sda] tag#0 CDB: Write(10) 2a 00 00 42 f6 00 00 00 1e 00
[80318.901519] print_req_error: I/O error, dev sda, sector 35106816
[80318.901529] Buffer I/O error on dev sda, logical block 4388352, lost async page write

From this, it is pretty clear that the hard drive is broken and should be changed. It just turns out that Apple made it notoriously hard to change the hard drive, with iFixit giving it a difficulty level of “Very difficult”. The drive will probably eventually fail, but I would like to use it until it fails.

So lets see if we can work around the problem with software instead. As filesystem creation didn’t fail on the drive, I suspect that there are working sectors located after the bad sectors that made the iPod crash. So what if we could just tell the filesystem not to use those bad sectors? It turns out most filesystems supports exactly that, and with FAT32 we can set the cluster value to 0x?FFFFFF7 to mark the clusters with bad sectors.

man 8 mkfs.fat tells us that we can use -l FILENAME to “Read the bad blocks list from FILENAME.”. So we’ll just have to figure out how to generate that list.

To figure out which sectors work, I started with the ‘badblocks’ program. The iPod claims a sector size of 4KB, so we’ll use that:

fdisk -l /dev/sda
Disk /dev/sda: 74.4 GiB, 79824777216 bytes, 19488471 sectors
Units: sectors of 1 * 4096 = 4096 bytes
Sector size (logical/physical): 4096 bytes / 4096 bytes
I/O size (minimum/optimal): 4096 bytes / 4096 byte

To find all the bad sectors, I tried the following (-s for show progress, -v for verbose).

# badblocks -o bad-blocks.txt -b 4096 -sv /dev/sda
Checking blocks 0 to 19488470
Checking for bad blocks (read-only test): done
Pass completed, 15097507 bad blocks found. (15097507/0/0 errors)

At some point my iPod rebooted/froze, and badblocks reported all the remaining sectors as bad. This sucks, as some of those sectors probably work.

What we can do is to look at the output, and find where it begins reporting all blocks as bad. Then we tell badblocks to start at a that point to work around the reboot (in my case it happens when I try to read or write to sector 4390976). This turned out to happen a lot, and was very slow and time consuming, so I switched to a different approach.

I came to think of the ddrescue tool, which is designed to be used with faulty drives, so I gave that a go. It turns out that we can misuse ddrescue to figure out which sectors can’t be read, by trying to recover all data from the disk and write the output to /dev/null. For some reason ddrescue is able to detect a bad sector without rebooting the iPod. Any sector that can’t be read, must be in the set of all bad sectors, so this will get us started. ddrescue will write the unrecoverable sectors to mapfile.txt.

# ddrescue --verbose --force --sector-size=4096 --cluster-size=1 --log-events=ddrescue.txt /dev/sda /dev/null mapfile.txt
GNU ddrescue 1.22
About to copy 79824 MBytes from '/dev/sda' to '/dev/null'
Starting positions: infile = 0 B, outfile = 0 B
Copy block size: 1 sectors Initial skip size: 208 sectors
Sector size: 4096 Bytes
ipos: 17982 MB, non-trimmed: 0 B, current rate: 32768 B/s opos: 17982 MB, non-scraped: 0 B, average rate: 975 kB/s
non-tried: 0 B, bad-sector: 41922 kB, error rate: 0 B/s
rescued: 79782 MB, bad areas: 7916, run time: 22h 43m 9s
pct rescued: 99.94%, read errors: 10235, remaining time: n/a
time since last successful read: n/a
Finished

This took a long time. Around 24 hours with my iPod.

When it finishes, you can visualize the result using ddrescueview, which plots good sectors as green, and bad sectors as red. There are way more sectors than there are “pixels” in the following picture – a single field represents many sectors. This is my result:

If we zoom in on one of the areas with bad blocks, we can spot a pattern, which I think kind of looks like scratches. If I remember correctly, this is zoomed all the way in, making each field represent a single sector.

Now that we have a list of sectors that can be read, we need determine which of those can be written to as well. To test this, we’ll try the badblocks program again, but this time we’ll tell it to skip the bad sectors found by ddrescue.

The mapfile is a table of position, size and a status row. Position and size are in bytes, and the status is a symbol with the following meaning:

'?'       non-tried block
'*'       failed block non-trimmed
'/'       failed block non-scraped
'-'       failed block bad-sector(s)
'+'       finished block  

$ head mapfile.txt
Mapfile. Created by GNU ddrescue version 1.22
 Command line: ddrescue --verbose --force --sector-size=4096 --cluster-size=1 --log-events=mapfile.txt /dev/sda /dev/null mapfile.txt
 Start time:   2018-12-08 00:44:45
 Current time: 2018-12-08 23:27:54
 Finished
 current_pos  current_status  current_pass
 0x42FDDE000     +               5
 pos        size  status
 0x00000000  0x42F43E000  +
 0x42F43E000  0x00001000  -
 0x42F43F000  0x0022F000  +
 0x42F66E000  0x00001000  -
 0x42F66F000  0x0018F000  +

To convert the mapfile into a format that is supported by badblocks, do:

$ ddrescuelog --list-blocks=- --block-size=4096 mapfile.txt > badblocks-from-ddrescue.txt

$ head badblocks-from-ddrescue.txt
4387902
4388462
4388862
4389821
4389822
4390088
4390364
4390515
4390630
4390648

We use this file as input to badblocks, and specify a block size of 4096 bytes which is the sector size.

# badblocks -n -v -s -b 4096 -i badblocks-from-ddrescue.txt -o badblocks.txt /dev/sda

-n = non-destructive read-write
-v = verbose
-s = Show progress
-b 4096 = block size
-i badblocks-from-ddrescue.txt = Skip a list of known bad blocks
-o = write the bad blocks to this file

I was expecting that command to find all the missing bad blocks, but it unfortunately didn’t go that well. My iPod soon crashed again, and I had to manually reboot the iPod and find the bad block index in the badblocks.txt file where it started to report all sectors as bad, merge all the found bad blocks together, and tell it to start from that new offset. After a few iterations of this, I gave up, and decided to try something else.

In the pattern we saw using ddrescueview, it looked like the bad blocks were somewhat grouped together. So what if we “filled out” the bad areas? A simple way to do this is to just consider all blocks near a bad block as bad. I wrote the following awk script to do just that.

1
2
3
4
5
6
7
8
9
10
11
12
13
14
15
16
17
18
19
20
21
22
23
24
25
26
27
28
29
30
31
32
33
34
35
36
37
BEGIN {
  # Tune this value
  gapTreshold = 4000

  # Stores the previous bad block we handeled
  lastBad = 0
} {
  currentBad = $1

  # Is the currentBad close to the lastBad block?
  if ((currentBad-lastBad) < gapTreshold) {
    # Fill out the entire space
    for (i = lastBad+1 ; i < currentBad; i++)
      print i
  } else {
    # We are not close to the previous block.
    # So lastBad must have been the last one in a streak.
    # Skip if lastBad = 0
    if (lastBad) {
      # Write bad blocks out after the last one
      for (i = lastBad+1; i < lastBad+(gapTreshold/2); i++)
        print i
    }

    # Write gapTreshold/2 bad blocks out before this one
    for (i = currentBad-(gapTreshold/2); i < currentBad; i++)
      print i
  }
  print currentBad
  lastBad = currentBad
}

END {
  # Print some bad blocks after the last block
  for (i = lastBad+1 ; i < lastBad + (gapTreshold/2); i++)
    print i
}

Setting the gapTreshold to 4000 is what eventually worked for me, and with that list as input (and around 10 iterations of badblocks where I would find a new bad block, add it to the list and re-run the script), I could run the badblocks program on the hard drive without crashing the iPod! (By the way: badblocks gets really resource hungry when you give it a large list as input!)

$ awk -f fill-gaps.awk badblocks.txt > badblocks-filled.txt
$ sudo badblocks -n -v -s -b 4096 -i badblocks-filled.txt /dev/sda # (no output)
$ wc -l badblocks.txt
10267
$ wc -l badblocks-filled.txt
943079

943079 * 4k sectors is a little less than 4GB of unusable blocks, which is very much acceptable! That means I should be able to use around 75GB of my iPod’s storage instead only 18GB!

Next step is creating the filesystem with our new list of bad blocks as input. I was expecting this to be the most simple step. I was wrong.

First step is to make a partition that the filesystem can reside on. This is the default layout on the iPod, and can be created using a tool like (g)parted:

# fdisk -l /dev/sda
Disk /dev/sda: 74.4 GiB, 79824777216 bytes, 19488471 sectors
Units: sectors of 1 * 4096 = 4096 bytes
Sector size (logical/physical): 4096 bytes / 4096 bytes
I/O size (minimum/optimal): 4096 bytes / 4096 bytes
Disklabel type: dos
Disk identifier: 0x20202020

Device Boot Start End Sectors Size Id Type
/dev/sda1 63 19488469 19488407 74.4G b W95 FAT32

Our partition starts on sector 63, so we need to compute our list of bad blocks relative to that offset. Moreover mkfs.vfat expects the list of bad blocks to be in 1KiB blocks (which took me a while to figure out – I just assumed it was sector size). We can get this by running:

$ awk '{oneKoffset = ($1 - 63) * 4; for (i = 0; i < 4; i++) { print oneKoffset + i } }' badblocks-filled.txt > 1KiB-rel-sector64.txt

Now we can create the filesystem by issuing (this should create the filesystem in the same way iTunes would):

# mkfs.fat -l 1KiB-rel-sector64.txt -F 32 -n iPod -S 4096 -s 4 /dev/sda

-l 1KiB-rel-sector64.txt = list of bad blocks used to mark clusters as bad
-F 32 = FAT32
-n iPod = label
-S 4096 = number of bytes per sector
-s 4 = sectors per cluster

This should have worked, but it didn’t. Hopefully this will get fixed in mkfs.fat sometime. On a windows machine the chkdsk program will report the total amount of space used by bad sectors, which didn’t match what I expect:

C:\Windows\system32>chkdsk /R D:
The type of the file system is FAT32.
Windows is verifying files and folders…
File and folder verification is complete.
Windows is verifying free space…
Free space verification is complete.
Windows has scanned the file system and found no problems.
No further action is required.
77,915,440 KB total disk space.
880 KB in 55 hidden files.
1,248 KB in 78 folders.
17,554,608 KB in 1,025 files.
131,216 KB in bad sectors.
60,227,472 KB are available.
16,384 bytes in each allocation unit. 4,869,715 total allocation units on disk. 3,764,217 allocation units available on disk.

So I got myself a copy of dosfstools which contains the mkfs.vfat program, and I realized that the bad block list didn’t work correctly when the logical sector size is specified (-S 4096) to be different from the default 512 bytes.

I developed the following patch to mkfs.vfat, which instead of interpreting the list as 1KiB blocks, assumes that the blocks are 4KiB.

1
2
3
4
5
6
7
8
9
10
11
12
13
14
15
16
17
18
19
20
21
22
23
24
25
26
27
28
29
30
31
32
33
34
35
36
37
38
39
40
41
42
43
44
45
diff --git a/src/mkfs.fat.c b/src/mkfs.fat.c
index 5843550..95c374e 100644
--- a/src/mkfs.fat.c
+++ b/src/mkfs.fat.c
@@ -421,12 +421,15 @@ static void get_list_blocks(char *filename)
     char *line = NULL;
     size_t linesize = 0;
     int lineno = 0;
+    int clusterno;
     char *end, *check;
 
     listfile = fopen(filename, "r");
     if (listfile == (FILE *) NULL)
        die("Can't open file of bad blocks");
 
+    printf("start_data_sector: %d\nstart_data_sector/8: %d\n, bs.cluster_size: %d\n", start_data_sector, start_data_sector/8, bs.cluster_size);
+
     while (1) {
        lineno++;
        ssize_t length = getline(&line, &linesize, listfile);
@@ -464,7 +467,16 @@ static void get_list_blocks(char *filename)
        if (end == line)
            continue;
 
+
+       // bs.cluster_size is sectors per cluster
+       clusterno = (blockno - (start_data_sector/8)) / bs.cluster_size;
+
+       // "Cluster index are 2-based: cluster 2 is actually cluster 0 in the data region."
+       // https://cerbero-blog.com/?p=1355
+       mark_FAT_cluster(clusterno + 2, FAT_BAD);
+
        /* Mark all of the sectors in the block as bad */
+/*
        for (i = 0; i < SECTORS_PER_BLOCK; i++) {
            unsigned long sector = blockno * SECTORS_PER_BLOCK + i;
 
@@ -482,6 +494,7 @@ static void get_list_blocks(char *filename)
 
            mark_sector_bad(sector);
        }
+*/
        badblocks++;
     }
     fclose(listfile);

And ran:

$ awk '{ print($1 - 63) }' badblocks-filled.txt > badblocks-filled-63.txt
# ./mkfs.fat -v -l badblocks-filled-63.txt -F 32 -n iPod -S 4096 -s 4 /dev/sda1
mkfs.fat 4.1+git (2017-01-24)
mkfs.fat: Warning: lowercase labels might not work properly with DOS or Windows
/dev/sda1 has 255 heads and 63 sectors per track,
hidden sectors 0x01f8;
logical sector size is 4096,
using 0xf8 media descriptor, with 19488407 sectors;
drive number 0x80;
filesystem has 2 32-bit FATs and 4 sectors per cluster.
FAT size is 4756 sectors, and provides 4869715 clusters.
There are 32 reserved sectors.
943078 bad blocks

New chkdsk output:

C:\Windows\system32>chkdsk D:
The type of the file system is FAT32.
Windows is verifying files and folders…
File and folder verification is complete.
Windows has scanned the file system and found no problems.
No further action is required.
77,915,440 KB total disk space.
32 KB in 2 hidden files.
8,960 KB in 550 folders.
29,575,712 KB in 10,650 files.
3,772,912 KB in bad sectors.
44,557,808 KB are available.

16,384 bytes in each allocation unit.
4,869,715 total allocation units on disk.
2,784,863 allocation units available on disk.

Yay! That looks exactly as it should. And I can confirm that I’m now able to put more than 70GB of data on my iPod!

Instead of using the OS supplied by Apple, I use a FOSS OS called Rockbox which I totally recommend. You have custom themes, it playbacks FLAC tracks, and even plays Doom!

Using Google’s BBR congestion control on Ubuntu Server 16.04

Most current congestion control algorithms rely on packet loss as the signal to slow it down. According to [1] this is ill-suited for todays modern networks.

The BBR congestion control algorithm, is an alternative used by Google, designed so it “reacts to actual congestion, not packet loss or transient queue delay, and is designed to converge with high probability to a point near the optimal operating point.”. [1]

To use BBR on Ubuntu 16.04, first step is to make sure your kernel is >=4.9.

If your kernel is 4.4 (as mine were), the best way to get a newer kernel, is to enable Ubuntu’s “LTS Enablement Stack”. [2] This is on Ubuntu server 16.04 simply done with:

# apt install --install-recommends linux-generic-hwe-16.04

For me, this installed 4.10.0.

Next we need to enable BBR for congestion control, but we also need to change the packet scheduler to fq [3] (though not required since patch [5]):
Append the following two lines to /etc/sysctl.conf (or put them in a new file in /etc/sysctl.d/):

net.core.default_qdisc = fq
net.ipv4.tcp_congestion_control = bbr

Reboot, and verify with:

$ sysctl net.ipv4.tcp_congestion_control
net.ipv4.tcp_congestion_control = bbr


While attending the BornHack camp I noticed that even though we had a 1 Gbit internet connection, I couldn’t download with more than 30mbit/sec from https://mirrors.dotsrc.org.

After some testing with iperf3, the cause of the low throughput seemed to come from packet loss on downstream traffic. With iperf3, on a single TCP stream I could only download with around 30 Mbit/s, but upload (which had no packed loss) with around 600mbit/sec.

I could use up the entire 1 Gbit link by telling iperf3 to use multiple TCP streams (e.g iperf3 -P 30).

Having a 1 Gbit link, but being unable to use it up has bugged me since Bornhack. Then I stumbled upon this BBR congestion control algorithm while reading a blogpost from Dropbox [4], and I decided to try it out.

So lets try to see if we can do better with BBR. Step 1 is to create a link, with similar conditions as on bornhack. I used a lxc container connected to the same switch as the server hosting mirrors.dotsrc.org, and added some RTT and packet loss.

On my client (the lxc container), I added around 40ms using:

# tc qdisc change dev eth0 root netem delay 40ms 4ms

And made it drop 0.003% of all incoming packages (this gave me the ~30 Mbits/s I was aiming for):

# iptables -A INPUT -m statistic --mode random --probability 0.003 -j DROP

iperf3 results, with the default (net.core.default_qdisc = pfifo_fast and net.ipv4.tcp_congestion_control = cubic):

ato@kvaser:~$ iperf3 -c 130.225.254.107 -N
 Connecting to host 130.225.254.107, port 5201
 [ 4] local 130.225.254.116 port 55802 connected to 130.225.254.107 port 5201
 [ ID] Interval Transfer Bandwidth Retr Cwnd
 [ 4] 0.00-1.00 sec 3.16 MBytes 26.5 Mbits/sec 15 91.9 KBytes
 [ 4] 1.00-2.00 sec 2.42 MBytes 20.3 Mbits/sec 9 76.4 KBytes
 [ 4] 2.00-3.00 sec 2.05 MBytes 17.2 Mbits/sec 0 97.6 KBytes
 [ 4] 3.00-4.00 sec 2.73 MBytes 22.9 Mbits/sec 0 113 KBytes
 [ 4] 4.00-5.00 sec 2.61 MBytes 21.9 Mbits/sec 1 96.2 KBytes
 [ 4] 5.00-6.00 sec 2.42 MBytes 20.3 Mbits/sec 12 80.6 KBytes
 [ 4] 6.00-7.00 sec 2.24 MBytes 18.8 Mbits/sec 6 69.3 KBytes
 [ 4] 7.00-8.00 sec 1.80 MBytes 15.1 Mbits/sec 0 87.7 KBytes
 [ 4] 8.00-9.00 sec 2.61 MBytes 21.9 Mbits/sec 0 106 KBytes
 [ 4] 9.00-10.00 sec 2.42 MBytes 20.3 Mbits/sec 2 91.9 KBytes
 - - - - - - - - - - - - - - - - - - - - - - - - -
 [ ID] Interval Transfer Bandwidth Retr
 [ 4] 0.00-10.00 sec 24.5 MBytes 20.5 Mbits/sec 45 sender
 [ 4] 0.00-10.00 sec 23.9 MBytes 20.0 Mbits/sec receiver

iperf Done.

With the new BBR congestion control enabled:

ato@kvaser:~$ iperf3 -c 130.225.254.107 -N
Connecting to host 130.225.254.107, port 5201
[ 4] local 130.225.254.116 port 55930 connected to 130.225.254.107 port 5201
[ ID] Interval Transfer Bandwidth Retr Cwnd
[ 4] 0.00-1.00 sec 34.5 MBytes 289 Mbits/sec 1139 5.71 MBytes 
[ 4] 1.00-2.00 sec 57.5 MBytes 482 Mbits/sec 76 6.04 MBytes 
[ 4] 2.00-3.00 sec 57.5 MBytes 482 Mbits/sec 117 2.48 MBytes 
[ 4] 3.00-4.00 sec 45.0 MBytes 377 Mbits/sec 129 5.92 MBytes 
[ 4] 4.00-5.00 sec 48.8 MBytes 409 Mbits/sec 135 2.49 MBytes 
[ 4] 5.00-6.00 sec 53.8 MBytes 451 Mbits/sec 105 5.81 MBytes 
[ 4] 6.00-7.00 sec 58.8 MBytes 493 Mbits/sec 69 5.99 MBytes 
[ 4] 7.00-8.00 sec 50.0 MBytes 419 Mbits/sec 81 5.71 MBytes 
[ 4] 8.00-9.00 sec 53.8 MBytes 451 Mbits/sec 103 5.84 MBytes 
[ 4] 9.00-10.00 sec 47.5 MBytes 398 Mbits/sec 111 2.61 MBytes 
- - - - - - - - - - - - - - - - - - - - - - - - -
[ ID] Interval Transfer Bandwidth Retr
[ 4] 0.00-10.00 sec 507 MBytes 425 Mbits/sec 2065 sender
[ 4] 0.00-10.00 sec 506 MBytes 424 Mbits/sec receiver

iperf Done.

From 20 Mbits/s to 400 Mbits/s. That’s just awesome. I’ll keep it enabled on https://mirrors.dotsrc.org, which should help people download the content we host much faster on links with a bit of packet loss 🙂

[1] https://git.kernel.org/pub/scm/linux/kernel/git/torvalds/linux.git/commit/?id=0f8782ea14974ce992618b55f0c041ef43ed0b78

[2] https://wiki.ubuntu.com/Kernel/LTSEnablementStack

[3] “NOTE: BBR *must* be used with the fq qdisc (“man tc-fq”) with pacing enabled, since pacing is integral to the BBR design and implementation. BBR without pacing would not function properly, and may incur unnecessary high packet loss rates.” [1]

[4] https://blogs.dropbox.com/tech/2017/09/optimizing-web-servers-for-high-throughput-and-low-latency/

[5] https://git.kernel.org/pub/scm/linux/kernel/git/davem/net-next.git/commit/?id=218af599fa635b107cfe10acf3249c4dfe5e4123